动画的原理就是每隔一段时间改变画面,这个时间小到眼睛无法识别,所以看起来就像是画面在动。
DOM 动画也是一样的,每隔 16 毫秒就改变 DOM 的某个 CSS 属性值,比如宽度、高度透明度等等,从而实现了我们所看到的 DOM 动画。
当然实现一个 DOM 动画类库并不是很困难,但一开始就要很完善很完美就很困难了,所以我准备从最简单的入手,先实现透明度动画,再实现透明度与宽度同时动画。
为什么先实现透明度呢?因为opacity的值没有单位,不像width有px单位,要改变width就要先分割值与单位,将值做改变后加上单位;也不像background-color一样可能是十六位进制#fff也可能是rgb(0, 0, 0)需要额外处理的。
流程图
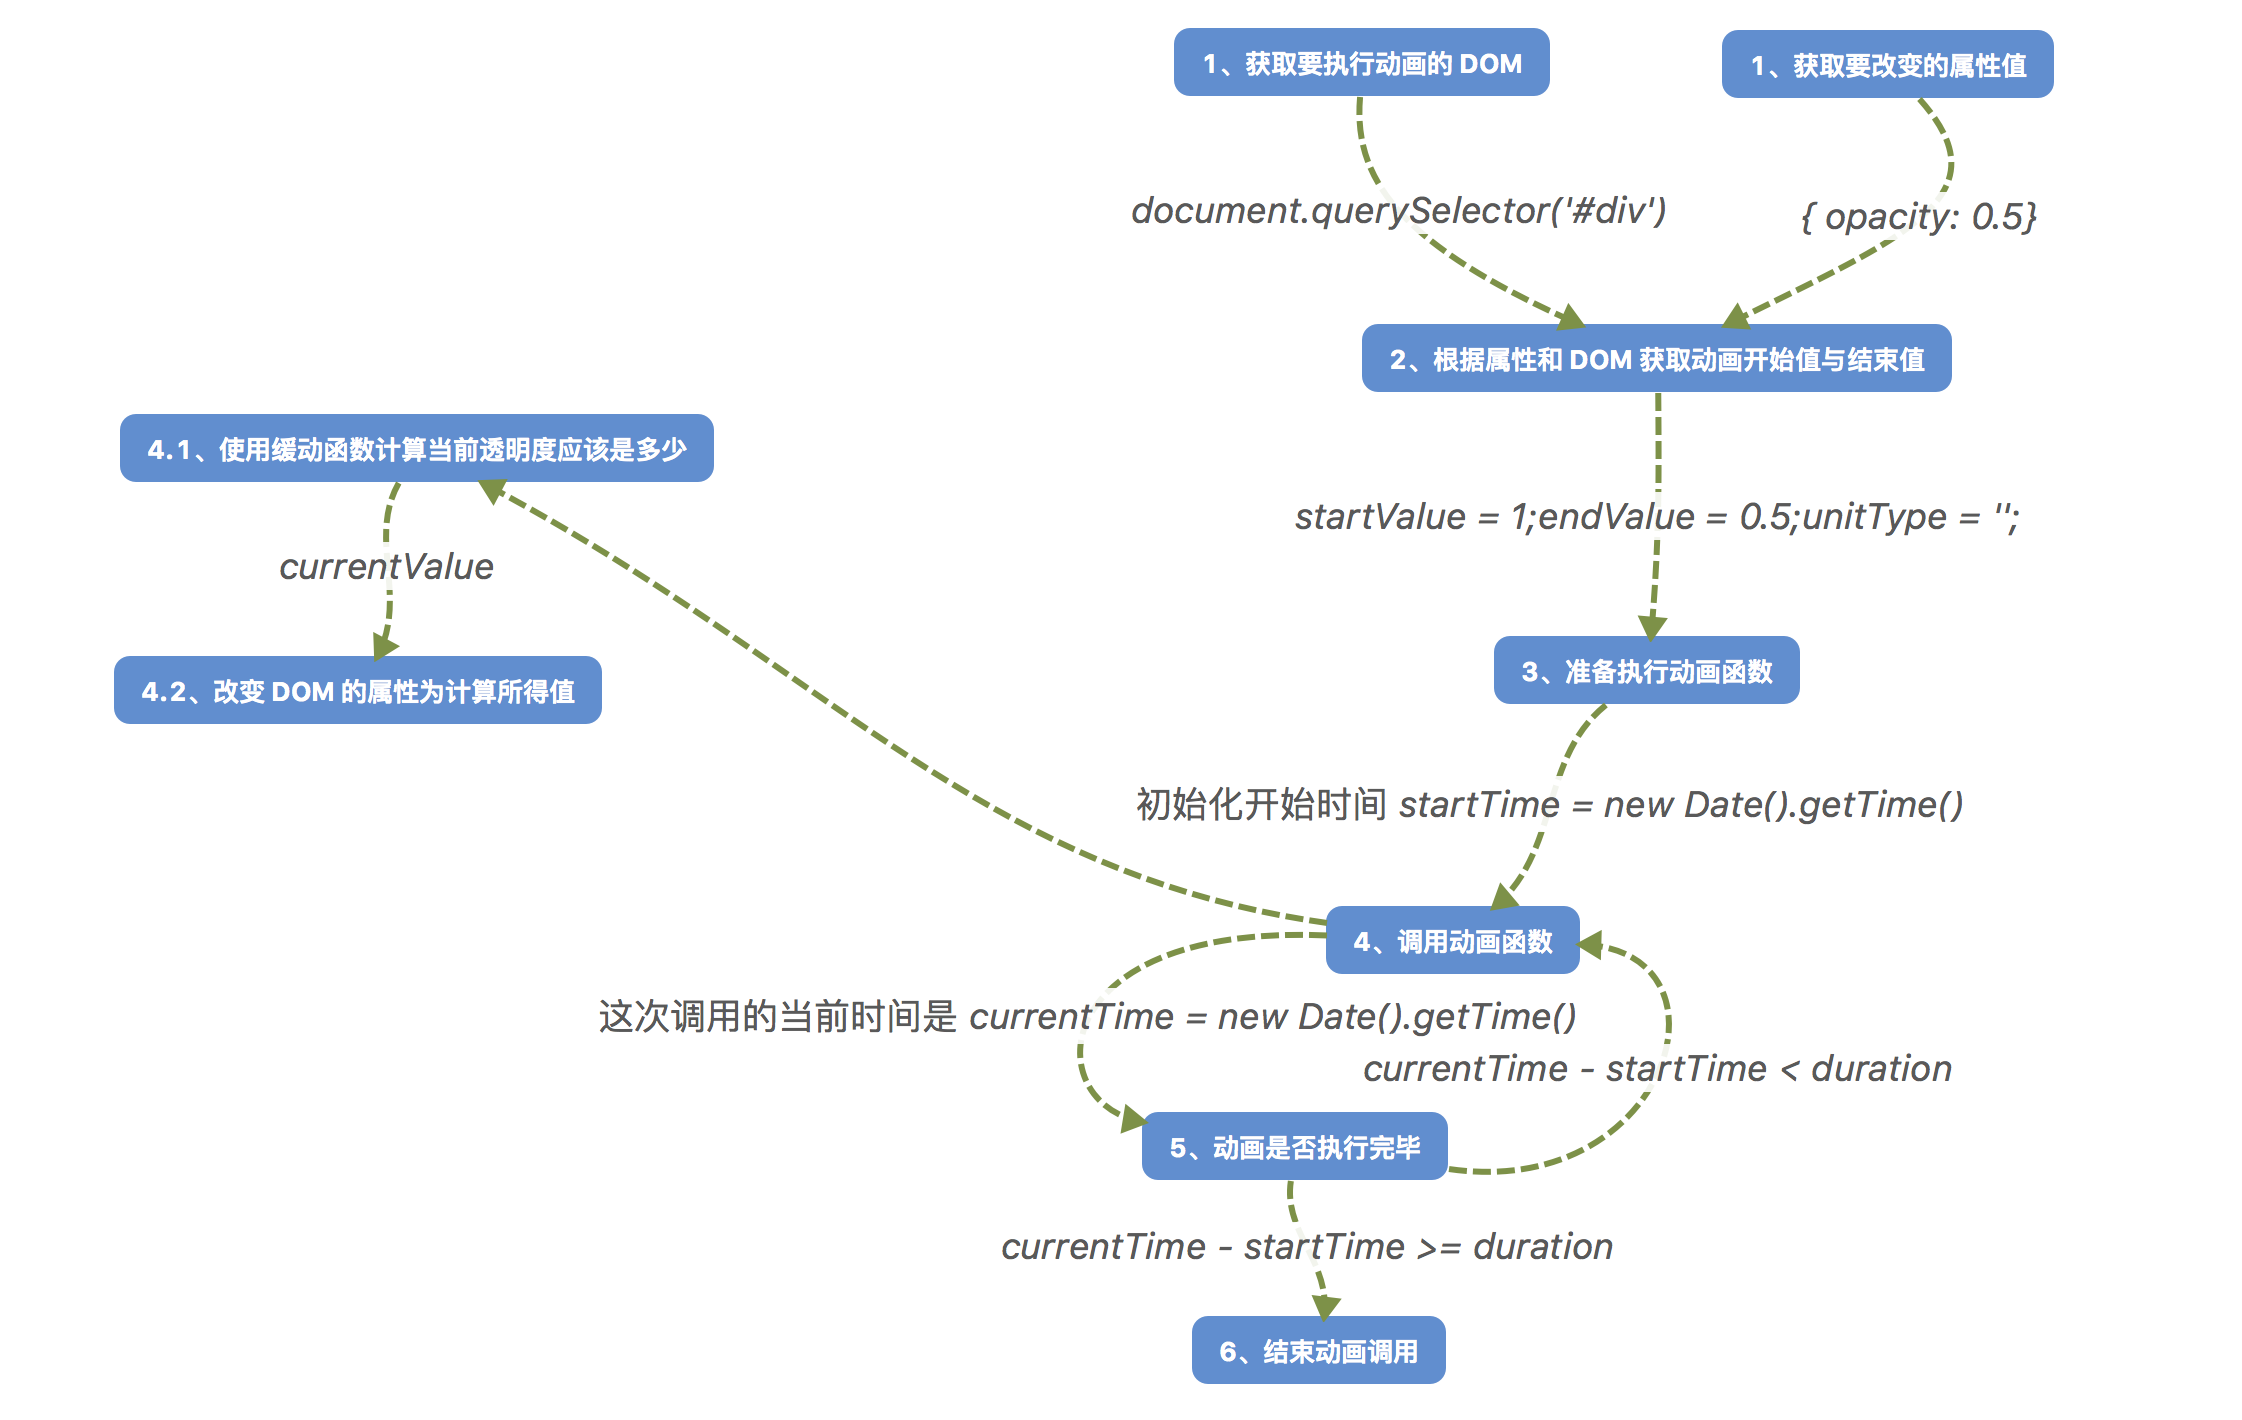
当然上面说的原理太虚无缥缈了,如果用流程图说明,大概就是这样的:
实际代码
落实到代码,总共有 5 个核心函数
- 获取开始值 getPropertyValue => 步骤2
- 分割属性值与单位 separateValue => 步骤2
- 动画函数 tick => 步骤 4
- 缓动函数计算当前值 easing => 步骤 4.1
- 改变 DOM 属性 setPropertyValue => 步骤 4.2
之后的代码都以实现下面的div透明度变化为目标。
1
2
3
4
5
6
7
8
9
10
11
12
13
14
15
16
17
18
19
20
21
22
23
24
25
26
27
28
| <!DOCTYPE html>
<html lang="zh">
<head>
<meta charset="UTF-8">
<title>测试</title>
<script src="./src/fakeVelocity.js"></script>
<style>
#div {
width: 300px;
height: 180px;
background-color: red;
}
</style>
</head>
<body>
<div id="div"></div>
<button id="run">点击执行动画</button>
<script>
window.onload = function () {
document.querySelector('#run').onclick = function () {
Animation(document.querySelector('#div'), {
opacity: 0.5
})
}
}
</script>
</body>
</html>
|
getPropertyValue
首先要获取到#div的初始透明度值,div.style.opacity?结果是空,这里需要用到getComputedStyle和getPropertyValue。
1
2
3
| function getPropertyValue (element, property) {
return window.getComputedStyle(element, null).getPropertyValue(property)
}
|
getPropertyValue是getComputedStyle返回对象的方法,所以不用担心会和我们自己定义的getPropertyValue冲突。
1
2
3
4
5
6
7
8
9
10
11
| function Animation (element, propertiesMap) {
let property,
startValue,
endValue,
unitType
for(property in propertiesMap) {
startValue = getPropertyValue(element, propertiesMap)
endValue = propertiesMap[property]
console.log(startValue, endValue)
}
}
|
此时能够正确获取到动画开始值与动画结束值分别为1、0.5。
separateValue
当然这个函数现在并没有用,因为opacity没有单位,但是我们知道后续需要增加有单位的值,所以先将这个函数声明好。
1
2
3
| function separateValue (property, value) {
return [value, '']
}
|
调用该函数后,将返回数组,第一个元素为值,第二个元素为单位。
1
2
3
4
5
6
7
8
9
10
11
12
13
14
15
16
17
| function Animation(element, propertiesMap) {
let property,
startValue,
endValue,
unitType
for(property in propertiesMap) {
startValue = getPropertyValue(element, property)
const separatedValue = separateValue(property, startValue)
startValue = separatedValue[0]
unitType = separatedValue[1]
endValue = propertiesMap[property]
}
}
|
OK,回过头看看流程图,现在到了第三步,准备执行动画函数tick了。
tick
先来声明好这个动画函数,前面也提到了,在这个函数内部,每次调用都会获取到当前时间,并与调用前声明的startTime进行比对,如果currentTime - startTime >= duration就结束动画,否则就再调用一次tick。
duration就是动画持续时间,通过配置项传入,这里暂时写死在代码中。
1
2
3
4
5
6
7
8
9
10
11
12
13
14
15
16
17
18
19
20
21
22
23
| const opts = {
duration: 400
}
3、准备调用动画函数
const startTime = new Date().getTime()
function tick () {
let currentTime = new Date().getTime()
const percentComplete = Math.min((currentTime - startTime) / opts.duration, 1)
let currentValue
if (percentComplete === 1) {
currentValue = endValue
} else {
currentValue = parseFloat(startValue) + (endValue - startValue) * easing['swing'](percentComplete)
}
console.log(currentValue)
}
tick()
|
先看5、计算动画时间是否结束,这里并没有按照之前说的计算方法currentTime - startTime >= duration计算动画是否结束,而是使用了比较
- (currentTime - startTime) / duration
- 1
这两个值的大小,取更小的那个值。当然currentTime - startTime大于等于duration时,才会是1更小,道理是相同的,不过因为
1
| (currentTime - startTime) / duration
|
这个值需要用在缓动函数内,所以就不做两次处理了,当然这样也是可以的,但是没必要不是吗?
1
2
3
4
5
| if ((currentTime - startTime) >= duration) {
percentComplete = 1
} else {
percentComplete = (currentTime - startTime) / duration
}
|
缓动函数
这个就是直接拿现成的算法来用了,上面代码是这样使用的:
1
| currentValue = parseFloat(startValue) + (endValue - startValue) * easing['swing'](percentComplete)
|
重点在后面的easing['swing'](percentComplete),很容易理解,easing是一个对象,有swing属性,并且对应的值是一个函数。
1
2
3
4
5
6
7
8
9
10
11
12
|
easing = {
swing: function (a) {
return .5 - Math.cos(a * Math.PI) / 2
},
Sine: function (p) {
return 1 - Math.cos(p * Math.PI / 2)
},
Circ: function (p) {
return 1 - Math.sqrt(1 - p * p)
}
}
|
这么做的好处很明显,如果我不想用swing这个缓动函数而想换一个,这样就可以:
1
| easing[opts.easing](percentComplete)
|
opts.easing只要传不同的字符串,就能够直接调用对应的函数,而且还可以让用户自己拓展easing这个对象,只要opts.easing能够对应上就可以了。
这其实就是策略模式。
结束动画调用
上面的tick函数只会执行一次,因为还没有用到setInterval或者requestAnimationFrame来重复调用tick函数。
只需要在tick函数最后面,调用requestAnimationFrame(tick)即可,不过要加一个结束条件,就是percentComplete !== 1。
1
2
3
4
5
6
7
8
9
10
11
12
13
14
15
16
17
| function tick () {
let currentTime = new Date().getTime()
const percentComplete = Math.min((currentTime - startTime) / opts.duration, 1)
let currentValue
if (percentComplete === 1) {
currentValue = endValue
} else {
currentValue = parseFloat(startValue) + (endValue - startValue) * easing['swing'](percentComplete)
}
console.log(currentValue)
if (percentComplete !== 1) {
requestAnimationFrame(tick)
}
}
|
现在打开控制台,点击按钮执行动画,就能看到打印1 ~ 0.5逐渐变化的过程,表示成功。现在就差最后一步,将这个值赋给 DOM 对应属性。
setPropertyValue
这个就简单了,
1
2
3
| function setPropertyValue (element, property, value) {
element.style[property] = value
}
|
所以在tick函数内这样调用该函数:
1
2
3
4
5
6
7
8
9
10
11
12
13
14
15
16
17
18
19
| function tick () {
let currentTime = new Date().getTime()
const percentComplete = Math.min((currentTime - startTime) / opts.duration, 1)
let currentValue
if (percentComplete === 1) {
currentValue = endValue
} else {
currentValue = parseFloat(startValue) + (endValue - startValue) * easing['swing'](percentComplete)
}
console.log(currentValue)
setPropertyValue(element, property, currentValue + unitType)
if (percentComplete !== 1) {
requestAnimationFrame(tick)
}
}
|
再重新刷新页面,点击按钮,看看能否正确改变透明度?
总结
真正的velocity.js源码有 4000+ 行,即使是最初的版本也有 2000+,而我们自己实现的仅仅有 60+,所以可想而知有多简陋,不过千里之行,始于足下,能够开始,就是进步。
参考
